- 코드스쿼드 두 번째 개인 프로젝트인 News-stand를 진행하면서 옵저버 패턴이라는 학습키워드를 접하게 되었고, 프로젝트에 적용해보았다.
- 옵저버 패턴은 프론트엔드 개발에서 자주 사용되는 디자인 패턴으로, 모듈간의 의존성을 낮게 하기 위해 사용된다.
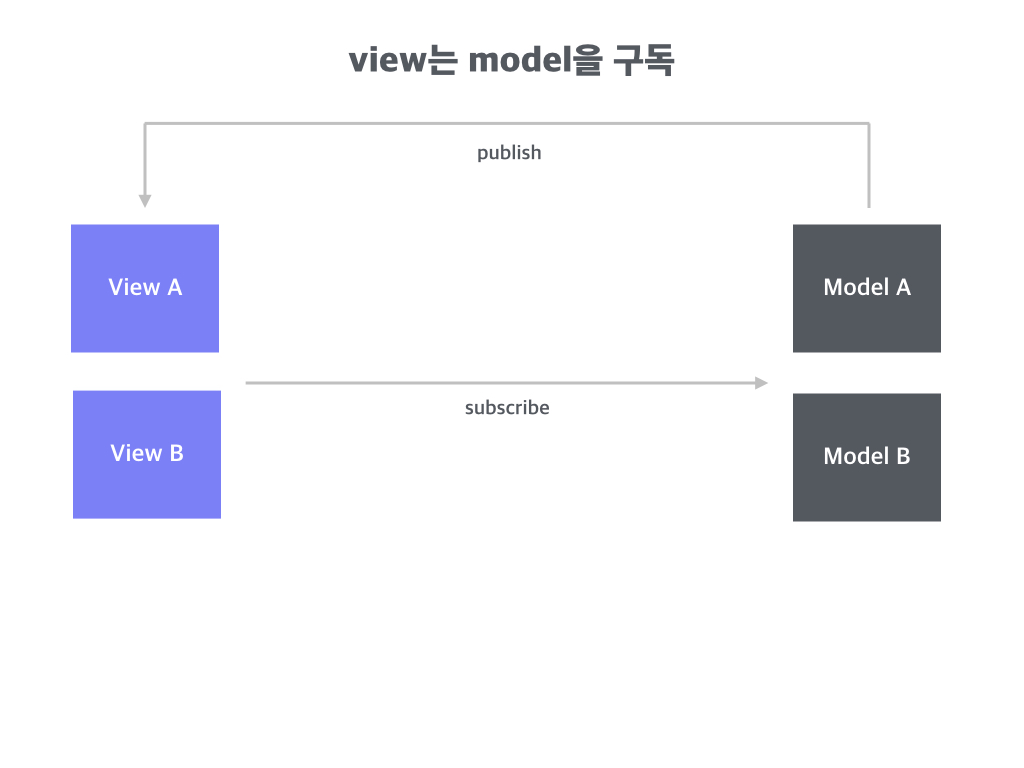
- 옵저버 패턴은 간단하게 말해 "구독"과 "발행" 개념으로 표현되며 View는 Model을 구독하고 Model의 상태가 변경되면, 이를 구독하고 있는 View의 렌더링 함수(혹은 등록해놓은 함수)가 실행된다.
- 즉, Model의 상태가 변경함에 따라서 해당 Model을 구독 중인 View가 자동으로 렌더링이 되는 구조이다.
Observer pattern 코드 및 사용
- 옵저버 패턴에서 옵저버를 구현해보자.
- 옵저버는 다음과 같은 역할을 한다.
1. 구독방법을 포함한다.
2. 구독리스트를 담는다.
3. 이벤트를 발행하는 방법을 포함한다.
- 아래 Observer는 실제 프로젝트에서 사용한 Observer pattern 코드이며, 위의 3가지 역할을 수행하고 있다.
export default class Observer {
  constructor() {
    // set 자료구조에 구독리스트를 보관했다
    this._observers = new Set();
  }

  // 구독자는 subscribe 메서드를 통해 this._observers에 추가된다.
  subscribe(observer) {
    this._observers.add(observer);
  }

  unsubscribe(observer) {
    this._observers.delete(observer);
  }

  // 이벤트가 발행되면 notify 메서드를 통해서 구독리스트에 있는 내용을 실행한다.
  notify(state) {
    this._observers.forEach((observer) => observer(state));
  }
}
- 프로젝트에는 Model과 View 관계에 옵저버 패턴을 적용했고 사용은 다음과 같다.
- View는 Model의 "상태"를 구독하고 있고 render 함수를 등록한다.
- Model은 상태가 변경되면, View(구독자)에게 "상태"가 변경되었음을 알리고 View(구독자)가 등록한 render 함수를 실행시킨다.
// Observer를 상속 받고, 뉴스스탠드의 상태(그리드 or 리스트, 전체 or 구독)을 관리하는 Model
export default class NSSectionCurViewStateModel extends Observer {
  constructor(dataFetcher) {
    super();
    this._curViewState = {
      render: RENDER_STATE.NOT_READY,
      gridOrList: VIEW_STATE.GRID,
      allOrSub: VIEW_STATE.ALL,

      index: 1,
      curListCategory: null,
      curListSubPress: null,
    };
    this._dataFetcher = dataFetcher;
    this._allPressData = {};
    this._gridPressData = [];
    this._subPressData = [];
    this._allCategory = [];
  }

    ...
    // 이벤트가 발생하여 현재 뉴스스탠드의 상태가 변경될 경우에 사용되는 함수
    // 현재와 다른 상태로 변경해야하는 경우, Model의 상태값을 변경하고
    // notify 함수를 통해서 View(구독자)가 등록한 render 함수를 실행한다.
    changeCurViewState(selectedState) {
    if (isEquivalent(this._curViewState, selectedState)) return;

    const selectedKeys = Object.keys(selectedState);
    for (const prop in this._curViewState) {
      if (selectedKeys.includes(prop)) {
        this._curViewState[prop] = selectedState[prop];
      }
    }
    this._curViewState.curListCategory = this._allCategory[0];
    this._curViewState.index = 1;
    const article = this._subPressData[0];
    this.setCurListSubPress(article);
    this.notify(this._curViewState);
  }

    ...
}
// 뉴스스탠드 상태를 관리하는 Model의 상태를 구독중인 View
export default class gridAllButtonView {
_buttonContainer;
constructor(curViewStateModel) {
this._curViewStateModel = curViewStateModel;
// Model에 render 함수를 등록
this._curViewStateModel.subscribe(this.render.bind(this));
this._state = {
gridOrList: VIEW_STATE.GRID,
allOrSub: VIEW_STATE.ALL,
};
}
// Model의 상태가 변경되고 이를 구독중인 View에게 notify가 되는 경우 실행되는 render 함수
render(selectedState) {
if (!isEquivalent(this._state, selectedState)) return;
const markup = this.getMarkup();
const parentElem = REFERENCE.NS_CONTAINER.querySelector('.newssection_button_container');
parentElem.innerHTML = '';
parentElem.insertAdjacentHTML('afterbegin', markup);
this._buttonContainer = parentElem.querySelector('.newssection_slide_buttons');
this.setEvent();
this.showOrHiddenSlideButton();
}
getMarkup() {
return `<div class="newssection_slide_buttons">
<button class="slide_button_left hidden">
<img src="/src/asset/newsSectionLeftButton.svg" alt="newsSectionLeftButton" />
</button>
<button class="slide_button_right">
<img src="/src/asset/newsSectionRightButton.svg" alt="newsSectionRightButton" />
</button>
</div>`;
}
...
}
고민 🤔
- Model은 상태가 변경되면 상태를 구독중인 모든 View에게 상태 변경을 알리고 등록된 render 함수를 실행하는데, 여러 개의 View(구독자)가 하나의 Model을 구독하고 있는 경우에 render가 필요한 View와 render가 필요하지 않은 View를 구분하는 방법이 고민이었다.
- Observer에서는 조건 처리 없이 모든 구독자이 등록한 render 함수를 실행하고 있기 때문에, 각각 View가 작은 상태를 갖게 하고, Model로부터 전달받은 상태가 본인의 상태와 일치하는 경우에만 render 함수를 실행하게 하여 해결하였다.
배운 점
- 디자인 패턴이라는 것도 처음 접했고, 옵저버 패턴을 학습하고 프로젝트에 적용하면서 많은 어려움이 있었지만, 옵저버 패턴을 사용한 구현을 통해 이벤트 기반의 아키텍처에 대해 이해할 수 있었고, 프로젝트에서 구현 이전 단계인 설계가 얼마나 중요한 지 배울 수 있었다.
- 많은 참고 자료들을 읽고 설계하고 개발을 했지만, 놓치고 있는 부분은 무엇이며 수정해야할 부분이 무엇인지에 대해서 정확히 인지하지 못한 것이 너무 아쉬웠지만, 기존 Amazon 프로젝트처럼 동작하기만을 바라며 프로젝트를 진행한 것이 아닌 목표가 있고 설계를 하고 개발을 진행한 것이 쉽지는 않았지만 즐거운 과정이었다.
'프로젝트 > 뉴스스탠드' 카테고리의 다른 글
| [기능 구현] requestAnimationFrame을 활용한 애니메이션 (0) | 2024.01.25 |
|---|---|
| 데이터 크롤링 및 json-server 활용 (2) | 2024.01.25 |
| Sass/Scss (0) | 2024.01.25 |

